Using An Electric Tuner; Step By Step Instructions
Playing guitar is a lot of fun. Like anything in the beginning it can be intimidating, especially if it isn’t in tune. You pick up the guitar and strum a chord and it causes you to cringe. You think you did something wrong. You double check to make sure you had your fingers in the right place and still it sounds bad. The logical conclusion is you a not good.
An out of tune guitar will sound terrible no matter how good you are at playing it. Tuning a piano is a lot of work and requires hiring someone to come to your house to tune it. Once a piano is tuned it will stay in tune for quite a long time. The guitar will require regular tuning. What is great about the guitar is that tuning is pretty easy and can be done quickly.
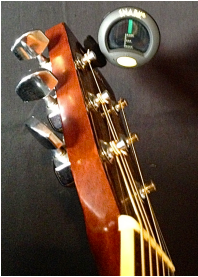
First you will need a tuner. You can use a pitch pipe or tuning fork to tune your guitar, but it’s very tricky to do it that way. I highly recommend using an electric tuner. The simplest one to use that I’ve found is a Snark. I’ve seen it as low as $10 and as high as $30 depending on which model you get and where you buy it. The least expensive and most basic model is all you will need. This kind of tuner clips onto the headstock of the guitar and picks up the vibrations to give you the pitch. Most other kinds have a small microphone that hears the note. Either will do. Some you can plug your electric guitar into with a guitar cable.
 Step 1 Understanding The Tuner
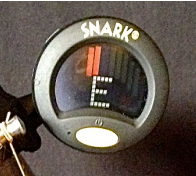
Turn on the electric tuner. There will most often be a screen displaying some unfamiliar stuff on it. Go ahead and pick the thinnest string also known as the high E string. The tuner will then calculate the pitch of the string played. If it is in tune it will say E and have a meter or gauge that tells you how close you are to that note. Kind of like a speedometer in a car. The will be a center point that represents it being perfectly in tune. If the needle, light, or whatever is used to indicate the specific current pitch is not right in the center then it is not perfectly in tune.
Step 2 Beginning To Tune
Follow the string past the end of the fretboard up to the tuning peg on the headstock. Each string has is wound to it’s own tuning peg. Now turn the tuning peg for the E string. The sound will go up or down It is important to listen closely as you watch the tuner. When the sound gets lower the gauge on the tuner will move to the left. When the sound gets higher it will move to the right. If it is left of center the note is flat or too low and if it is right of center the note if sharp or too high. The confusing part for must beginners is getting to the right note. If you are in F then even if you tune it to the center point it is not in tune. So make sure the letter displayed on the screen is E for the first string. If it is F then you need to lower the pitch quite a bit. If it is D or D# then it needs to come up a lot. The # or b symbols can easily be over looked, so make sure you don’t see those. A D# is called D Sharp and Db is call D Flat.
Step 3 Fine Tuning
Once you see the E with no #’s or b’s then it is time to fine tune. There will be differences in guitars on how much you have to turn the tuning peg to get it just right. It can be annoying when it keeps moving too far one way or the other. Be patient. Eventually you’ll get good at it. The more you listen to the note the better you will get at knowing how far you are adjusting it on any guitar.
Step 4 Tuning the other strings
After the E string is in tune move to the next string and proceed tuning them thinnest to thickest. See this article on How to tune your guitar for details about the names and locations of each string. After you’ve tuned all the strings go back and check each one starting with the high E string. Sometimes the added tension to the strings will cause others to go out of tune. This is normal especially on brand new strings and guitars with subpar tuning pegs. If your guitar is very poor quality it can be impossible to keep or even get it in tune for various reasons. More on that in this article on Buying a beginning guitar.


 Step 1 Understanding The Tuner